Saturday, December 17, 2011

Wise Clock 4 - Using the RTC 1Hz "Heartbeat"

DS3231 can generate a square wave output signal through pin 3 (aptly named "SQW"). Same pin can be also activated (set low) when one of the two internal alarms is triggered (that's why this pin is also called "INT").

Wise Clock 4 has the INT/SQW pin connected to D2 through a jumper. Therefore, to be able to use this RTC signal, a jumper must connect the 2-header pins, as shown in the picture below (jumper is red, between processor and SD card socket).


Since I don't seem to get things perfect from the first try, I forgot to add the mandatory 10k pull-up resistor (this is fixed in the next iteration of the board, shipping as of mid Dec 2011). Here is how you need to connect the pull-up resistor, as shown in the next photo. Solder one terminal of the resistor in the via (it fits the hole) and the other terminal to the 2-pin header.


Once the hardware is ready, compile and upload this very simple sketch.

#include "WProgram.h"
#include "Wire.h"
#include "DS3231.h"


void rtc_interrupt()
{
  Serial.println(millis());
}


void setup()
{
  RTC.enableSQW();
  Serial.begin(57600);
  Serial.println("RTC square wave enabled");
  pinMode(2, INPUT);
  attachInterrupt(2, rtc_interrupt, RISING);
}


void loop()
{
}

The sketch (tested with Arduino IDE 22) enables the 1Hz square wave on the RTC and attaches an ISR ("interrupt service routine") that gets executed once every second. (You can see the output of the ISR function in the serial monitor.)

Notes:
  • The square wave is not enabled by default as DS3231 gets powered. To enable the square wave, bit 2 of the register 0x0E must be set to 0 (it is 1 by default).
  • The square wave frequency can be one of the 4 values: 1Hz, 1024Hz, 4096Hz and 9182Hz. This frequency is selected by setting 2 bits (3 and 4) in control register 0x0E (check page 13 of the datasheet).
  • The file DS3231.h (also required is DS3231.cpp) is the one included in the WiseClock3 library.

I see at least two applications where this square wave/interrupt line can be used:
  • RTC alarm waking up the clock from sleep mode;
  • chronometer.

Friday, December 16, 2011

Data logging with Wise Clock 3/4

If you ever tried to compile the SD library (packaged with Arduino IDE 22 and 23) targeting the Sanguino board (which also covers Wise Clock 3 and Wise Clock 4), you got compilation errors.

For example, compiling Datalogger.pde with the Sanguino file setup detailed here, will give these kinds of errors:

Datalogger:67: error: 'class File' has no member named 'println'
Datalogger:67: error: 'dataString' was not declared in this scope

The main cause for these errors is missing files (e.g. Stream.h, WString.h). Even if you fix these compilation errors, Datalogger.pde sketch will still not work, and this is because SPI pins are incorrectly defined for Sanguino. (Note that the Datalogger sketch compiles and works fine for Arduino.)


I know that Arduino IDE 22 and 23 are no longer supported, but I bet many out there are still using them, as I do. Until I upgrade to Arduino 1.0, I think it is worth fixing the issue in these older IDEs.


So here is the quick recipe for covering the Sanguino board in Arduino 22 and 23 IDEs:

1. add the following section to Arduino-0022/hardware/arduino/boards.txt file:


##############################
sanguino.name=Sanguino
sanguino.upload.protocol=stk500
sanguino.upload.maximum_size=63488
sanguino.upload.speed=38400
sanguino.bootloader.low_fuses=0xFF
sanguino.bootloader.high_fuses=0xDC
sanguino.bootloader.extended_fuses=0xFD
sanguino.bootloader.path=atmega644p
sanguino.bootloader.file=ATmegaBOOT_644P.hex
sanguino.bootloader.unlock_bits=0x3F
sanguino.bootloader.lock_bits=0x0F
sanguino.build.mcu=atmega644p
sanguino.build.f_cpu=16000000L
sanguino.build.core=sanguino
sanguino.verbose=false

2. Download file sanguino22.zip and expand its content into the folder Arduino-0022/hardware/arduino/cores/. This will create the folder "sanguino" under "cores".

Sanguino22.zip contains the following files, copied from Arduino-0022/hardware/arduino/cores/arduino/:


Only 2 4 of the original Arduino files have been modified specifically for Sanguino, and they are: pins_arduino.h
pins_arduino.c.
WInterrupts.c
wiring_private.h

Note (March 12/2012): I updated the zip file to include the last two files enumerated above. The original Arduino ones did not handle attachInterrupt() correctly, as the original Sanguino files (released a long time ago for version 18) did. So I just copied over the old files.

By following the 2 steps above, you should be able to compile sketches for the "Sanguino" target (selectable from the menu "Tools/Board" of the IDE). (A few extra steps are required to be able to burn the bootloader, but I will leave this out for now, for the sake of simplicity.)

Now try compiling and uploading Datalogger.pde and see the results for yourself: data is appended to the file datalog.txt on SD card.

Note: The Wise Clock 3/4 software handles reading from SD card just fine even with the old Sanguino files because the SPI pins are defined in the file mmc.cpp, which is part of the Wise Clock 3/4 library. The SD library relies on externally-defined (in file pins_arduino.h) SPI pins.

Guess why am I bringing up data logging on Wise Clock 4? :)

Friday, December 2, 2011

Buy Complete Wise Clock 4 kit - includes display and enclosure

Update May 12, 2018
The complete kit is no longer offered since Sure Electronics discontinued the LED display.
I still sell the kit without the display, for those who can provide their own display, either from old stock or by making it themselves.
I may also have the bigger (5mm LED) display in stock, or may recycle some older ones. Please email me to inquire.


Update July 7, 2015
Before you buy, please read this post on assembling the Wise Clock 4 with the new display.


When you buy the "Complete Wise Clock 4 kit", on top of the Wise Clock 4 kit you get the 3216 bi-color (red/green/orange) LED display from Sure Electronics, plus the enclosure, consisting of two laser-cut transparent acrylic plates and the required hardware (standoffs, screws etc) to assemble it.


The "complete kit" comes with everything you need to build a functional Wise Clock 4. You will need to add your own FAT16/FAT32-formatted SD card (with the necessary files on it), the miniB USB power cable and, eventually, an BTBee module (if you want Wise Clock 4 to display messages sent from your Android device).


The assembly guide, written by StefanK, can be found here.


Thursday, December 1, 2011

Wise Clock 3 - Dec 2011 software release

From the desk of Mr. Ruud, a new software release for Wise Clock 3 is now available.
Below is the long list of impressive features, improvements, changes etc. Ruud, thanks again.

  • Because of the large number (28) of menu entries the menu is now split in 2 loops, one for the Apps and one for the Settings.
------------------
  Apps menu loop:
  SETUP, QUOTE, BIG, TIX, WORDS, CNTDN, STOPW, SCORE, PONG, PACMN, TCLOK, UTC, LIFE, DEMO, STATS.

  Settings menu loop:
  APPS, ALARM, AL+/AL-, DATE+/DATE-, REMI+/REMI-, TEMP+/TEMP-, MESG+/MESG-, CHME+/CHME-, FONT+/FONT-, CELC/FAHR, 24H+/24H-, TIME, Y M D, DAY, SLEEP.

Selecting the "SETUP" menu entry will take you to the Settings menu loop, selecting the "APPS" menu entry
will take you to the Apps menu loop.
------------------
  • Stopwatch: This will show the time passed by in tenths of seconds, pressing the Set key will show the "lap" time.
  • Count Down Timer: This timer allows for setting a time of up to 24 hours and will beep 3 times after counting down to 0 seconds.
  • TIX clock: Showing the time using colored squares (if you do not know what a TIX clock is, Google it!) The PLUS key alows for changing the interval between 1, 4 and 60 seconds.
  • Time Clock: This allows for recording the amount of time spent on a project. You clock "IN" at the start of the project and clock "OUT" when you are finished for the day. The Time clock will show the total amount of hours and minutes spent on that project over several days. It allows for 5 different projects. A project may be cleared by pressing the Plus key when the "IN?" text is displayed, a future version will store all "IN" and "OUT" times together with the project number in  an Excel compatible file on the SD card. This file may then be processed on a PC using Excel.
  • "Word Clock": This will show the time and date using words instead of numbers. All "words" come from a "word" text file on the SD card and can be changed with any editor. At runtime you may choose from 10 different "word" files. Currently there are 5 different "word" files included:
  1. word1.txt The "official" English version showing: "The time is seven minutes past one o'clock in the morning on Monday the fourth of July."
  2. word2.txt The short English version showing: "It's one oh-seven am"
  3. word3.txt The "funny" English version showing: "It's 5 + 2 past six and you are up early"
  4. word4.txt The French texts version showing: "Le temps est sept minutes apres une heure du matin."
  5. word5.txt Example file for advertisement purposes, showing texts like: "We are now closed, opening hours are from 9 - 5" or "10% extra discount from 12 - 1".
  You may create your own versions with whatever texts/language you like, see the word1.txt file for details.

  • New large Font: This new proportional font, selected by "FONT+/FONT-", is 14 dots high and has variable width (letter i = 2 dots wide, letter m = 10 dots wide).
  • The "message.txt" file now contains, 10 different personal messages, the "MESG+" menu entry allows for selecting one of them (M1, M2, M3 etc.).
  • The "Quotes" menu entry now let you choose from up to 10 different "Quotes" files named quot1.txt, quot2.txt etc. several sample files (like: Texts by Shakespeare, fake alarm system, Spanish lesson, the clock's user manual (what you are reading now = "quot0.txt") are included. If you select the 11th file then the "message.txt" file is displayed which shows e.g. all 10 personal messages, reminders, DST etc.You may put your own "quote" file on the SD card, make sure that lines are not longer then 175 characters and end with a Carriage Return and Linefeed character. The file must be bigger then 512 bytes.
  • It is now possible to put characters in the non visible "video" ram and make them visible by overlaying the present display in horizontal or vertical mode. When in Big Mode, press the Set Key to see a demo.
  • The "UTC" mode now allows for changing the number of hours difference (+12 till -12). It allows for showing the time in "Graph" (= analog clock) or "Text" mode. The "Time.txt" file is no longer used and should be removed.
  • The temperature (TEMP+ menu entry) will now also show the highest and lowest temperature for that day.
  • The brightness is now changed with the Plus Key and the scroll speed with the Set key. The Set key is used in some of the new apps, but the brightness can always be changed with the Plus Key. 
  • "STATS" menu: This menu entry will show the highest and lowest temperature for the current year, the last time the power went off and the time when the power came back. It may take up to 24 hours before this info is available.

NOTE: The filemanager for the SD card is limited, so if you want to make any change to the files on the SD card then format the SD card first and copy all files in one go to the SD card. Also there cannot be more then 16 files on the SD Card.


Monday, November 28, 2011

Buy Wise Clock 4 kit

The Wise Clock 4 kit includes the following parts (shown in the photo below):


  • PCB;
  • SD card socket (pre-soldered);
  • DS3231 extremely accurate RTC (real time clock) chip, soldered to the board;
  • MIC5219 voltage regulator, soldered to the board;
  • 74HC125 level shifter (5V to 3V3), soldered to the board;
  • 2 SMD LEDs (soldered);
  • 3 SMD resistors (soldered);
  • ATmega644P, with the latest Wise Clock 4 software;
  • 40-pin socket; 
  • 16MHz crystal;
  • 2 x 22pF ceramic capacitors;
  • CR1220 backup battery for RTC;
  • holder for the coin battery;
  • 3 x right-angle push buttons;
  • 9 x 10k resistors;
  • 3 x 4k7 resistors;
  • piezo buzzer;
  • USB miniB connector;
  • 6-pin right-angle male header (FTDI connector);
  • two 2x8-pin female headers (display connectors);
  • two 10-pin 2mm female headers (XBee connectors);
  • 220/470 uF electrolytic capacitor;
  • 3 x 100nF decoupling capacitors.
Note that the first bunch of components in the list are SMDs and come soldered to the board (that is, I solder them for you).

US$67 US$57, free shipping to North America

Please contact me for pricing to outside North America. (Usually, for Europe, the price is $5 more.)

To build a finished Wise Clock 4, you need to add your own 3216 display (made by Sure Electronics and sold on their site or on ebay), which plugs directly into the board (no cables are required to connect the Wise Clock 4 board to the display). You will also need to build your own enclosure.

Please read this post on how to connect the Wise Clock 4 board to the redesigned version of the display.

Assembling the Wise Clock 4 kit is very similar to assembling Wise Clock 3, shown here. (The few differences between the two kits are related to the XBee, and are very easy to figure out. Regardless, all new components are SMD and they come pre-soldered.)

If you want the "Complete Wise Clock 4 kit", that includes the 3216 display and a simple yet elegant enclosure, please visit this page.

The ATmega644P processor comes already loaded with the latest software, so you don't need to use the Arduino IDE to compile and upload the code. Essentially, after soldering all components in place, Wise Clock  4 should work right away.

Upgrading the software on Wise Clock 4 (when a new release is published) is similar to Wise Clock 3, and this process is detailed here.

Also note that, although Wise Clock 4 has support for the XBee RF wireless modules, no XBee module is included in this kit.

Saturday, November 26, 2011

Testing the XBee on Wise Clock 4

To test the XBee on Wise Clock 4 I used the sketch below (upload it to the board; display is not required).

int nCount = 0;
void setup()
{
  Serial.begin(9600);
  Serial1.begin(9600);
  Serial.println("WC4 XBee ready for comm..."); 
}


void loop()
{
  // read from port 1, report characters on port 0:
  while (Serial1.available())
  {
    char inChar = Serial1.read();
    Serial.print(inChar); 
  }
  Serial1.print("WC4 XBee transmit ");
  Serial1.print(nCount++);
  Serial1.print(", ");
  Serial1.println(millis());
  delay(3000);
}

Notice the use of Serial1 instance to talk to the XBee, since this is connected to the second hardware serial port of the ATmega644P (D10/D11, pins 16/17). Had Sanguino offered no support for the second USART, we could have used NewSoftwareSerial library.

The second XBee is linked directly to a terminal (e.g. HyperTerminal in Windows, or Terminal panel in the X-CTU application from Digi). I personally used the XBee Adapter from Adafruit, connected through the FTDI cable to the PC as shown here.

Once this XBee test passed, you can adapt the Wise Clock 4 software to display any message sent to it from a second XBee. A simple hack is to add to the function fetchMessage() in file WiseClock4.cpp, as shown below:

void WiseClock4::fetchMessage()
{
  // new code for XBee............
  // read from XBee into the "personalized message" buffer;
  char* Ptr1 = &personalMsg[0];
  if (Serial1.available())
  {
    while (Serial1.available())
    {
      *Ptr1++ = Serial1.read();
    }
    *Ptr1 = 0;
  }

  // existing code................
  strcpy(msgLine, "      ");

Now, instead of the personalized message (read from file message.txt on the SD card) you will get whatever is sent from the terminal application (second XBee).

Don't forget to add this line in function setup (file WiseClock4.pde):

  Serial1.begin(9600);


Thursday, November 24, 2011

Dual screen Wise Clock 4

Using two 3216 displays together is an almost trivial hack. I wanted to make sure it works fine with the Wise Clock 4 board. The video below shows the new board running both "Night and Day" and "Wise Clock 3" (merged into one sketch, of course).


In practice, one can now build the "Dual Screen Wise Clock 4" with the two displays placed on opposite sides (back to back), or one next to the other (as shown in the video). A crazy idea would be to have 4 displays placed in a square :)

Friday, November 18, 2011

"Make: Special Issue: Ultimate Kit Guide" featuring Wise Clock 3

Thank you for the honor, Make: magazine!


Here is the actual Make: web site dedicated to kit reviews.


Wednesday, November 16, 2011

Wise Clock 4

The new Wise Clock 4 board has two main improvements over Wise Clock 3:
  • support for the XBee family of wireless RF modules (XBee, XBee Pro, XBee Wi-Fi, and the similar foot-printed Roving Networks WiFly RN-XV);
  • ability to easily connect a second display; this is achieved by moving the power connector on the "right" side, plus bringing the extension display connector closer to the bottom of the board.


Wise Clock 4 is "almost" compatible with Wise Clock 3. To run the existing sketch on Wise Clock 4, two changes are required:
  • Plus button is now on D3 (D2 is now designated for interrupts from RTC);
  • D15 is now connected to the CS line of the display, replacing D11, which is now used for communication with the Xbee module.


As can be noticed from the photos, a few more components are in SMD package (necessary to keep the size of the board to a minimum, to fit in the back of the 3216 display):

  • the level shifting buffer 74HC125;
  • three optional LEDs: 2 for the XBee communication lines, one for power;
  • the 3V3 voltage regulator MIC5219, capable of providing 500mA.


Updated Nov 26, 2011
The schematic, pictured below, can be downloaded from here (Eagle file).


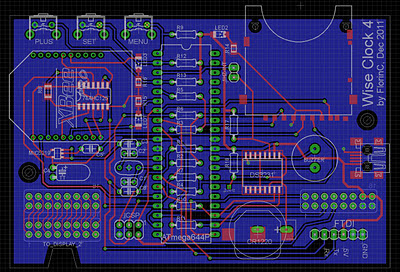
The board layout, shown below, can be downloaded from here.


Monday, November 7, 2011

Freebees

Purchase any of my kits and you can get one (or more, if you ask nicely :) freebee from this page (just email me with your choice).

I am currently giving away a few "surplus" boards and LED matrices.
Shown below are, from left to right:


You can also get the PCB for DWex, a small Arduino + RTC, that you can make into a DIY pocket/pendant watch. This board is mostly SMD, but not difficult to solder with a little exercise.


Any of the above PCBs can be used as originally intended (for kits), since there is nothing wrong with them (as far as I know). The challenge in building the LED matrix shields is in finding the right matrices (which is almost impossible, since they were "kind-of" custom made for me by a Chinese LED company some time ago). Nevertheless, one can connect other (compatible, that is common cathodes) types of LED matrices with wires, as this project demonstrates.

Next, there are 2 LED matrices. The left one is a 48mm x 48mm common anode RG, named GMA4688C, for which I couldn't find the datasheet. It is easy to figure out the pin configuration by checking the LEDs with a battery (and resistor, of course). The one on the right is a red LED matrix, 58mm x 58mm in size.


Keep an eye on this page as I will update it periodically. I will soon add other components (LEDs, rotary encoders, ribbon cables, terminal blocks etc) and remove the out-of-stock ones.

Also, if you need other parts for your projects, ask and I may be able to help.

Here is more:
  • SD card (empty) boxes


  • 16-wires ribbon cables


  • DS1307 (either in SMD SOIC or DIP) + crystal 32,768Hz
  • 2-pin terminal block
  • small and flat speaker, 16 ohms


  • LEDs (various shapes, colors and sizes)


  • rotary encoder (right angle)


  • laser-cut plexiglass plate (3mm thick) for the 2416 single-color LED display from Sure


Sunday, November 6, 2011

Lexon travel clock

I am very "productive" lately (or maybe just wasteful with my time): this is my sixth post in as many consecutive days.

I recently "discovered", in a design shop, this great looking travel clock made by Lexon.


Things I like about it:
  • beautiful shape/form/dimensions (low profile, small, light) and nice finish (brushed aluminum);
  • apparent simplicity, with just one large(ish) button on the top and the lesser-used buttons placed on the bottom;
  • LCD screen covering the whole face, showing more than the time (date, day, temperature, alarm);
  • low consumption; powered by 2 CR2032 batteries, one for the clock, the other for the LCD backlight;
  • attention to detail is everywhere, including the bottom rubber bumpers: the front ones are higher than the back ones, as seen in the next photo.


This Lexon clock should be good inspiration for clock makers and clock designers.
I hope one day my Wise Clock N will be as great as this is :)

Saturday, November 5, 2011

LunaTik "reloaded"

This is my original post on LunaTik.

Coincidentally (I guess the Apple iPod Nano team thinks that they found the ideal shape and size), the latest, 7th, generation of iPod Nano has the exact same dimensions as the one it replaces (and for which LunaTik was designed). So, LunaTik and TikTok get a new (and well deserved) lease on life, from Apple itself. More, LunaTik is actually mentioned in one of Apple's presentations, officially endorsing the brand. Actually, even the current (6th) generation iPod Nano can be software-upgraded through iTunes with 16 new clock faces (some of them shown in the photo below, courtesy of LunaTik team, sent by email via kickstarter).


But this is not all. As I anticipated, watch "modules" (shown below) are being developed to be hosted by LunaTik. This could become the flagship of the designer watches. Can you imagine high-end watchmakers producing watches that fit LunaTik? How far fetched is to see a custom made-for-LunaTik Omega, for example?


A metal (aluminum) strap is in the works too. This new design, shown in the photo below (also received via kickstarter email) is called "Lynk", and available starting December 2011.


On the other hand, clones have started to pop up (see ebay), at much reduced prices.
I bought, out of curiosity, the black "LunaTik" from a Chinese site for $24. Packaging is identical (and as hard to unpack as the original), the 2-page presentation manual is the same and the two small Allen keys are included as well.


You can't tell until you look at the content. My black "LunaTik" has shiny silvery buckle, scratched aluminum strap stop and white steel socket screws. You get what you pay for. I wouldn't be surprised to see the black layer worn out after a few weeks/days (I may be a little ashamed to wear it in public though).

Friday, November 4, 2011

CubeClock

This would make a nice replacement for the original glass-domed WiseClock.


I named it CubeClock for the simple reason that it is encased in a baseball display case, found on ebay for about $5.
It includes Wiseduino (with on-board RTC), a LiPo battery shield (I used the one from seeedstudio, but others should work too), a prototype shield with the cheap "orientation sensor" introduced here, and the bi-color LED mini-display shield.

The bottom board is the Wiseduino, secured to the box with 2 screws. The other shields are just stacked on top of each other. The battery shield from seeedstudio, discussed here, uses a 1,000mAh LiPo battery (did not come with the shield), attached to the shield itself with plastic ties. The clock can be turned on or off (to save the battery) from the power switch on the Wiseduino.

CubeClock can also be powered through the USB cable plugged into the battery shield (which also charges the LiPo battery), as shown below.


A closer look is shown in the next photo. The 2 buttons on the mini display shield and the power switch are on the opposite side. They are accessible after the top of box is removed, as is the FTDI connector.


The current sketch running on CubeClock is almost identical to the one on SillyClock (and IllyClock, for that matter), since the mini display shield uses almost the same schematic as the dual bi-color LED matrix shield.
The next release of the software should involve the "2-axis tilt sensor" (already connected on pin A3) to change the display according to its orientation. It could also include the displaying of messages from the 32KB EEPROM on the Wiseduino board (as does the glass-domed WiseClock).

Other ideas:
  • add infrared receiver (on D2, with interrupt; code picked from WiseClock);
  • add buzzer (on D16/A2, the only pin left unused at this point) for alarm clock functionality (half-implemented in the software already).

Thursday, November 3, 2011

Finding STP16DP05 in DIL package

It may have occurred to you to find an interesting device with LEDs, only to realize that it uses components that are obsolete and cannot be sourced anymore (or if they can , they may be prohibitively expensive). Such is the case with STP16DP05 in DIL (dual-in-line) package, used in a few kits by EvilMadScience.com and ModernDevice.com. STP16DP05 is a 16-bit LED sink driver still manufactured in SMD, but obsolete (and impossible to find) in "through-hole".

If you want to build such open-source popular kits as "Meggy Jr RGB" or "Peggy 2", you will have to re-design the board, replacing the DIL package with the SMD. What if you already have the PCB and are constrained to use the DIL version? The immediate solution that comes to mind is to use a breakout board with an SMD. Problem is, I couldn't find a breakout to the "narrow", 0.3", DIL format; they are all 0.6" wide.

So, the only choice I had was to use a replacement DIL for the STP15DP05. The first equivalent I found was  MBI5026. Only after I received the few I bought (on ebay), I realized they have a different distance between pins (in the metric system). Complete write-off, since I have no chance to ever use these. Their complete name is MBI5026GNS. It never crossed my mind that there is a "metric" standard for ICs in DIL package. Well, lesson learned, but problem still there.
Later, I found out that MBI5026 also comes in the "inch" standard as well. Problem solved, finally.

A second choice would be A6278/A6279. They are pin-to-pin compatible with STP16DP05. Actually these are the LED drivers shipped with the "display board kit" from ModernDevice.com. (And this is how I found out about them, by buying that kit.)

This may not be directly applicable to the kit "business", but another lesson I learned is to design a board for multiple packages of the same IC, thus having a bigger selection for the parts.


Conclusion: pin-to-pin equivalents for the DIL version of STP16DP05 are MBI5026 and A6278/A6279. None of them are offered by digikey or mouser (in DIL format), but you may be able to find them on ebay, expecially the MBI5026. Pay attention to what you order though, since MBI5026 comes in 2 different DIL packages. Anyway, new projects designed around STP16DP05 should not rely on the DIP package. (Note: This is the case of ClockTHREE and C3Jr, both of which use STP16DP05 SMD on breakout boards. Smart.)

Wednesday, November 2, 2011

LiPo batteries and charger shields - part 2

This should be an update to a previous post (I am too lazy to edit that nicely).

I bought two LiPo battery shields, one from Seeedstudio, one from cutedigi. None came with a LiPo battery. I guess it is assumed that the user selects the battery that suits his needs. My main need was for a battery that fit between the headers and was lower than the height of the headers, so that another shield can be stacked on top. Guess what: it's not easy to find such a LiPo battery. The round, AA or AAA-compatible ones, are out of the questions because of their size. The only candidates would be those silvery-flat-rectangular ones, as those pictured below.


The best match for the "Solar charger" from seeedstudio is the third LiPo in the photo, with a capacity of 1,000mAh. For comparison, 3 AA rechargeable batteries (1.2V each, making a similar 3.6V) usually have a capacity of 2,200 - 2,800mAh. So this flat LiPo battery would be a bit less than half of the capacity of the space-consuming and heavy pack of 3xAAs.

The next photo shows the LiPo battery installed in the shield.


Updated Nov 4, 2001
The "solar charger" from seeedstudio I have is V1. It is currently discontinued and replaced by "Solar Charger Shield V2". I don't know if there was a technical issue with V1, but my shield has the male headers shorter than the regular size. While building CubeClock, I had trouble with the contacts: some of the signals (A0 and A1, required by the buttons on the mini display shield) did not get passed the charger shield. After some investigation I figured that the charger shield was the culprit, specifically the shorter pins. The new V2 charger shield seems (from the photos) to have solved this issue.


All of the above batteries were purchased from seeedstudio. The second from left in the photo is sold as the "DSO Nano replacement battery" and dimensions were not published at the time. Now you can see it's a bit shorter than the 1,000mAh LiPo and almost 50% thinner.

A nice battery, size-wise and capacity-wise, is the right-most one in the photo. Although it does not fit on the top of the shield (and between the headers), it can be used underneath if you find a method for attaching it (I am still thinking).
Other bigger-capacity LiPos (e.g. 3,000mAh, 6,000mAh) are built by sticking together in shrink-wrap several of the ones shown above.

As for the charger shield from cutedigi, I cannot find an immediate use for it. It can only be used as the top shield, since it does not have extension headers. Also, the space for battery is quite small. The 500mAh LiPo can somehow fit, as shown in the photo below.


 The battery would also need to be attached somehow; plastic ties come to mind, maybe this is the purpose of the 6 holes in the board. The 3 LEDs (top-left corner) should be left visible, yet another restriction on placing the LiPo battery. Maybe it's not for nothing that "600mAh" is written in the silkscreen of the board. Cutedigi may have designed this charger shield for a specific battery, which they don't make available.

As always, your comments are appreciated.

Tuesday, November 1, 2011

From the "fan club" - LindorClock

Fellow Arduino enthusiast Anjan sent me these photos of his own interpretation of IllyClock, encased in a "compatible" Lindor chocolate case. I think it looks great.

From the email:
I put this one in a Lindor chocolate case and so the name. I had to cut the Lindor case to almost 2/3 rd the height to make it fit and look nice. The front design is still not complete, as you can see the  components and wires inside.


He used his own LED matrices with my Dual bi-color LED matrix shield, hence the wires and the prototyping board in the next two photos.


Keep up the great job Anjan. You are an inspiration to others.

Saturday, October 29, 2011

Wyolum 2011 Innovation grant

Here is some motivation for you: Wyolum is offering two "$1,000 Innovation Grant" to the most qualified open source project applications submitted from now until Dec 3, 2011.


From the "news release":

WyoLum, LLC’s mission is to “Promote Open Source Hardware”.
To that end, we are pleased to announce two $1000 (USD) grants to be awarded to the most qualified applicants.

Entries will be evaluated on:
● Innovation
● Originality
● Technical feasibility
● Commercial viability
● Planned use of funds
● Timeline (Projects with goals that can be achieved within six months after the grant is awarded will score more favorably.)

Qualifying projects will be 100% open source (hardware and software) from development through to production. WyoLum team members will be available for advice and assistance throughout your project. If you have a killer idea, but have never fabricated a PCB, programmed a micro-controller or designed an enclosure, don’t let that stop you from submitting your idea. If we can’t immediately assist you, we will learn it together.

Submit completed applications to grants@wyolum.com by December 3, 2011. Applications will be excepted in a combination of video (encouraged), html, .odt, .doc, .docx, blogpost. We will make all reasonable efforts to receive and evaluate your application.

Wednesday, October 26, 2011

Hacking Meggy Jr. RGB

You have a Megga Jr RGB "game console" from EMSL and you are tired of playing or writing new games for it. How about making it into a clock?
This takes a bit of hardware hacking on your side; I provide the basic-clock-functionality sketch (download here).
In the end, the "Meggy Jr Clock" will look and work as shown in this video.


Here is a list of what you need (beside an working Meggy Jr):

  • DS1307 and a 8-pin socket;
  • crystal (32768Hz);
  • coin battery (CR1220) and a holder for it;
  • a small piece of prototyping board;
  • 2 pieces of 6-pin female header;
  • 6-pin right-angle male header;
  • a few wires.
We will start with hacking the Meggy Jr board, which involves 3 steps:
  • remove the FTDI connector; you know the drill: desoldering wick, pliers etc;
  • in place of the FTDI connector solder a 6-pin female header;
  • connect, with a short piece of wire the 2 points as shown in the picture below.


The hacked Meggy Jr board will look as shown in this photo:


Next, we will build, on prototyping board, the circuit for the real-time-clock based on DS1307, as shown in the datasheet. We will use the 32768Hz crystal and the 3V coin battery (CR1220, with holder).

There are two requirements for the small RTC board we are building:

  • it will have a pair of 6-pin male headers that plug into the new headers we just installed on the Meggy Jr board;
  • it needs to fit in the small space above the processor, between the Meggy Jr edges, the buttons and the LED matrix.

So here is how we are going to do it:
- cut the piece of prototyping board to size;
- place it on the spot, above the headers;
- solder the 2 headers (which are already plugged in the female headers);
- place and wire the RTC circuitry;
- solder the new FTDI connector (6-pin right angle male header) at the top of the board, close to the edge (above the old one we removed);
- connect each of the 6 pins of the FTDI connector to the pins of the top header.

The little RTC board you built may look like in the photos below (both sides shown).


Now we put them together (plug the RTC board into the headers) and start testing.

The Meggy Jr Clock we just built will look something like this:


First, make sure the new FTDI connector works, by uploading any sketch.
Next, make sure the DS1307 works as well, by uploading this test sketch.

Once everything looks ok, upload the Meggy Jr Clock sketch

If you need more detailed instructions, please visit my step-by-step tutorial at instructables.com.